
Names of the board and paddle parts
SUP basics

Paddle strokes, swapping hands and turning

Read the words in the picture
Names of the board and paddle parts
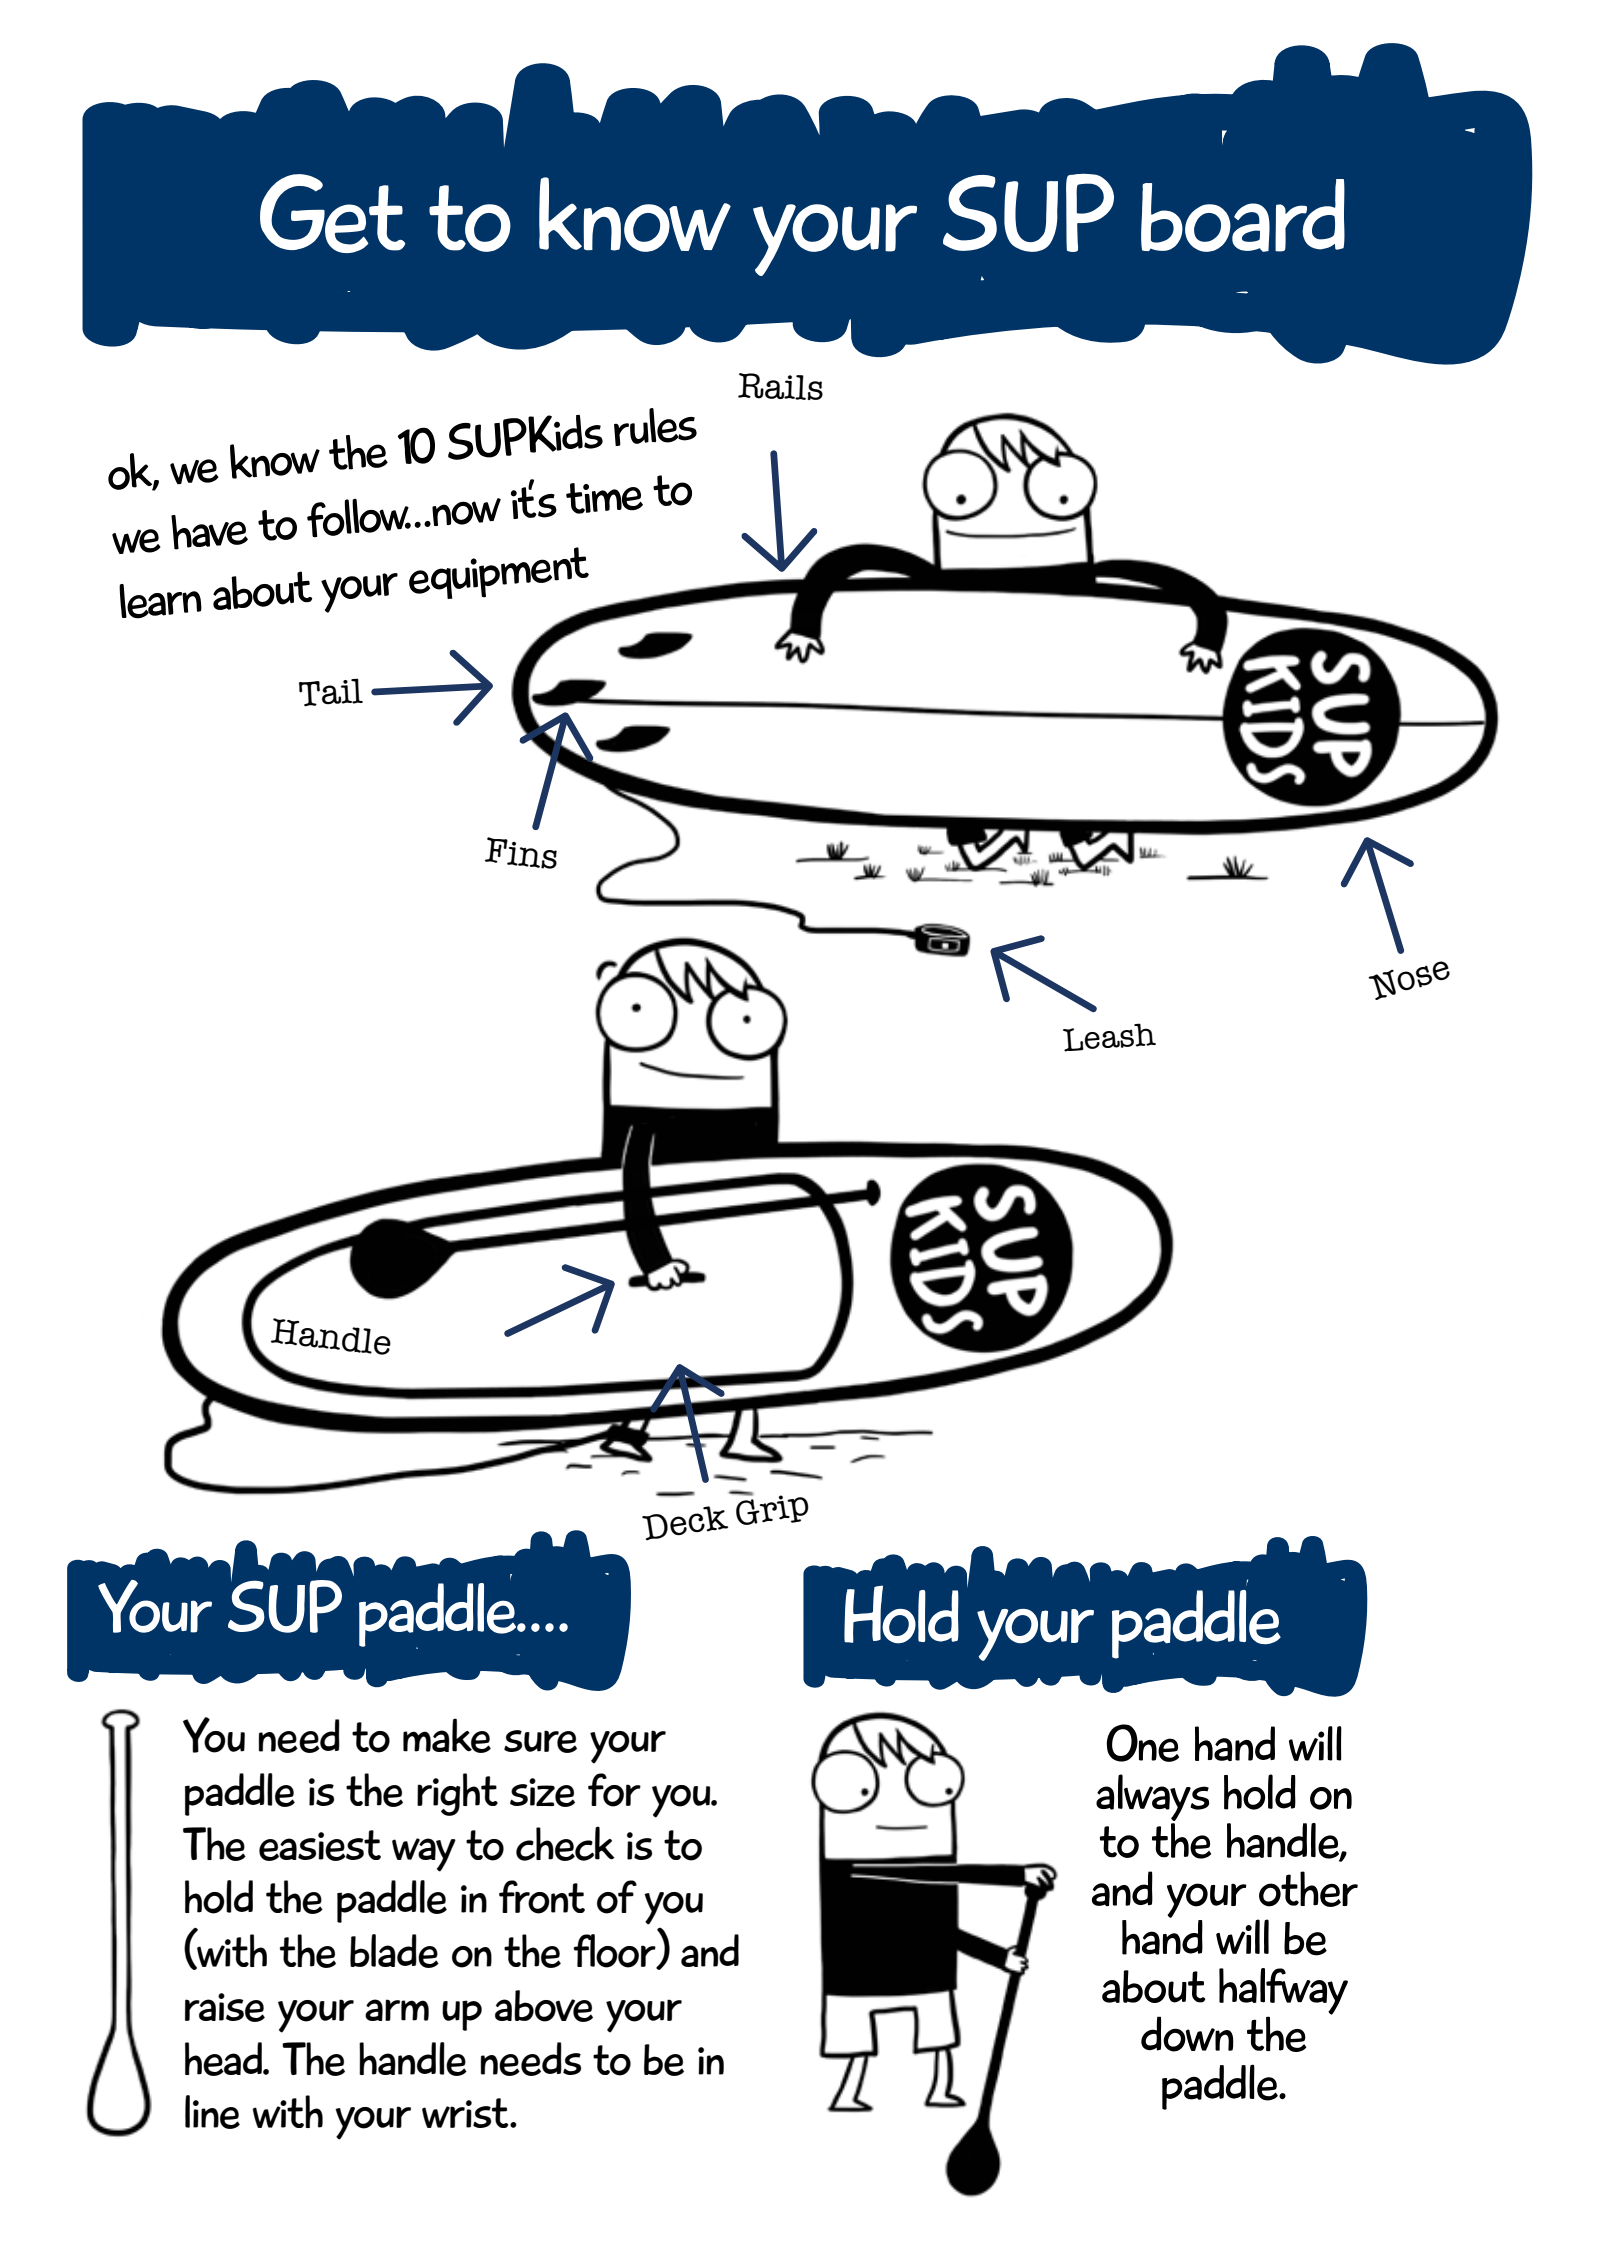
- Get to know your SUP board
- ok, we know the 10 SUPKids rules we have to follow...now it's time to learn about your equipment
- Rails
- Tail
- Fins
- Nose
- Leash
- Handle
- Deck Grip
- Your SUP paddle....
- Hold your paddle
- You need to make sure your paddle is the right size for you. The easiest way to check is to hold the paddle in front of you (with the blade on the floor) and raise your arm up above your head. The handle needs to be in line with your wrist.
- One hand will always hold on to the handle, and your other hand will be about halfway down the paddle.
SUP basics
- Here's some SUP basics!
- Carry your board
- Put on your leash & PFD
- SUP boards might look big, but they're actually not too heavy. The best way to carry them is by holding on to the handle with one arm and holding on to your paddle with the other. Make sure the fin is facing towards you and is in front (so you don't bump it into anyone). Oh, and don't let your leash trail behind you on the floor!
- This is one of the most important things to remember. A leash keeps us attached to our board, so if anything goes wrong, we can stay floating on our board till someone comes to help us. Make sure your leash is done up nice & tight, and that the bit where the leash is attached to your ankle is facing outwards (so you don't trip up!). Don't forget to put on your PFD (Personal Floatation Device) before you get in the water.
- Stand on your board
- The best way to stand up on your board is to start from the lying down position. Once you feel stable, you can go onto your hands & knees, putting the paddle across the board in front of you, and then slowly get up to your feet.
- Make sure your feet are hips width apart, your knees are a little bent, your back is straight and that you keep your chin up and face forwards. Stay relaxed and smile.
- ECO TEAM TIP:
- We all learn at different paces. It is important remember that especially when you're learning to paddle with a group your friends. Some people will learn faster, some slower, but we will all learn. It's important to slow down, ask questions, try things in different ways, and most of all, have fun in the learning process!
- Fiona Wylde
Paddle strokes, swapping hands and turning
- Basic stroke
- Swap hands
- We split the stroke into 4 easy parts. The first part is called the 'catch'. Lean forwards and put the whole blade in the water. Make sure your top & bottom hands are stacked one above the other (so the paddle is straight). Keep the paddle close to the board. Make sure you are looking forwards, with a straight back and have your knees bent a little.
- The second part is called the 'power phase'. This is when you move the paddle back towards you. Try to keep your arms quite straight. Bring the paddle back to where your feet are.
- The third part is called the 'release'. This is the part when you take the paddle out of the water. As soon as the paddle passes your feet, you should take it out. Twist your top hand so your thumb is facing forwards.
- The last part is called the 'recovery'. This is when you bring the paddle back up to the front of the board to start again.
- What do you think would happen if you only paddled on one side? Youd' end up going round in circles! So every few strokes, you need to swap hands. All you need to do is move your top hand down to where your bottom hand is, and move your bottom hand up to where your top hand was. Then you'll be ready to do a stroke on the other side.
- Basic turn
- There are a few different types of turn, but we'll start with the easiest one! Put your paddle behind you (near the tail of the board) and bring the paddle back towards the nose, in a big half circle movement. Make sure you stay low and keep your knees bent so you don't fall off.
Get to know your gear, then link the moves
A SUP board may look long and wide, but each part has its own name and job. The front is the nose, the back is the tail and the side edges are the rails. You can also find the fins underneath, the handle you hold to carry it, the deck grip where your feet go and the leash that connects the board to you. When you know the names, it's easier to match the picture to the real gear when you hear 'Where should we hold it?' in a lesson.
Your paddle needs to fit your body, too. The workbook shows a way to check. Stand the paddle with the blade on the floor, reach your arm up and see whether the handle lines up with your wrist. Use this as a starting point and set the length with your coach. One hand holds the handle at the top and the other holds the shaft lower down. This is how you learn what each hand does.
Now shall we read the steps for carrying your gear, finding your balance and pulling through the water? In the workbook, Fiona Wylde says everyone learns at a different pace. If you can't stand up right away, you can ask questions and try another way. What follows is a guide to help you understand the moves before a lesson. Real practice on the water happens with your coach.
Try it together
Check how to carry the board and what to wear
Find where to hold the board's handle and the paddle. Look at how the board is carried so the fin doesn't bump into people or things. It's also important to gather up the leash so it doesn't drag along the ground. Before you get in the water, put on your personal flotation device (PFD). Check with your coach which leash and way of attaching it fit the place you'll paddle. If the board is heavy or hard to lift, ask for help.
Find your balance in a low position
The basics picture shows the order. First, feel steady lying down. Then put your hands and knees on the board, lay the paddle across the front and slowly stand up. When you stand, keep your feet about hip width apart and bend your knees a little. Keep your back straight and look forward. Look at the picture and say the steps in order. In a real lesson, practice from the step where your balance feels comfortable.
Read the four parts of one paddle stroke
The first part is the catch, when you put the whole blade in the water in front of you. Next is the power phase, when you pull the paddle back toward your feet, close to the board. When the paddle passes your feet, you take it out of the water. Then you bring it back to the front of the board, and one stroke is done. Also look at how the knees and back stay. Instead of swinging fast with just your arms, slowly trace how the four parts flow together.
Tell swapping hands and turning apart
If you keep paddling on the same side, the board can change direction. To paddle on the other side, you learn to switch where your top and bottom hands hold. The basic turn in the picture means putting the paddle in near the back of the board and drawing a big half circle toward the front. Look at the picture that shows bent knees and a low position. Then ask your coach to show you each of the two moves.
Let’s talk
What do you think?
- During one paddle stroke, when is the paddle in the water and when is it out of the water?
- If you stand up at a different speed from your friends, what help would you like to ask your coach for?
Where the pictures and activities come from
SUPKids workbook p. 10 ↗ · p. 12 ↗ · p. 13 ↗
The pictures are pages from the original workbook. The steps and questions below are Starboard Korea’s notes to help families use them together.
Save the original workbook ↓